


A Complete Setup Guide for Contabo VPS Ubuntu 20.04 with preinstalled Webmin + LAMP

Background
Last Updated:
[2023-05-31] Added a section for Upgrading from PHP 7.4 to 8.1 and Upgrading from PHP 8.1 to 8.2.
[2022-01-22] Fix grammatical errors.
[2023-01-19] Fix the SQL commands in the Databases / Create Database section.
[2023-05-31] Added a section for Upgrading from PHP 7.4 to 8.1 and Upgrading from PHP 8.1 to 8.2.
[2022-01-22] Fix grammatical errors.
[2023-01-19] Fix the SQL commands in the Databases / Create Database section.
I haven’t touched the Linux server for ages and getting used to it with Cpanel or Parallel. However, as we need to scale up our internal websites and lower the hosting cost, I need to go back to managing these natively in Linux. When configuring with Ubuntu Linux, it doesn’t sound very comforting. However, it turned out it’s not too bad as I thought – it’s like riding a bike all over again 🙂
We decided to go with Contabo for all public external interface servers, and internally we used Microsoft Azure and DigitalOcean/Docker. I set up a few virtual servers in Australia, Germany, and the United States. They are in various modes: test, staging, or production servers. Each server has an FTP backup storage. Ideally, it will be a mirror between these two sites.
As I progressed, I found a few challenges and started documenting this. This guideline becomes our standard when we deploy the Ubuntu Linux virtual machine.
Let’s dig into it!
Setup and Configuration
Updates
GUI
Open your browser and enter the URL that Contabo supplied for Webmin access.
For instance: xxx.contaboserver.net:10000
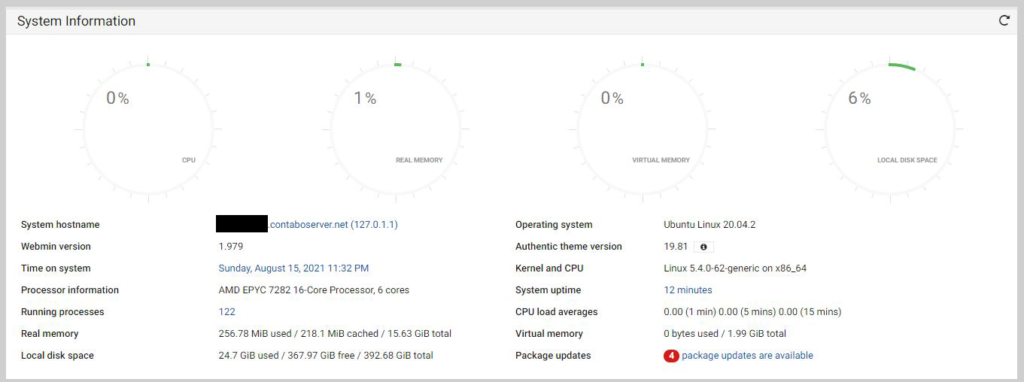
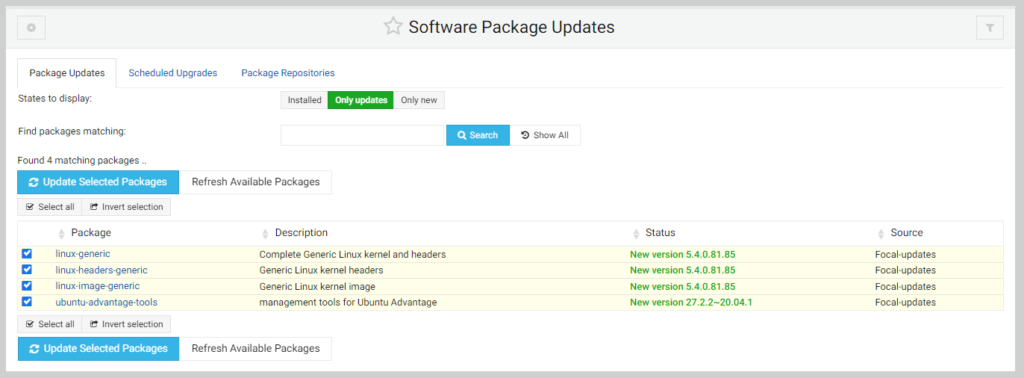
Under the Dashboard, click the link on Package updates, if any.
Click the Update Selected Packages button.
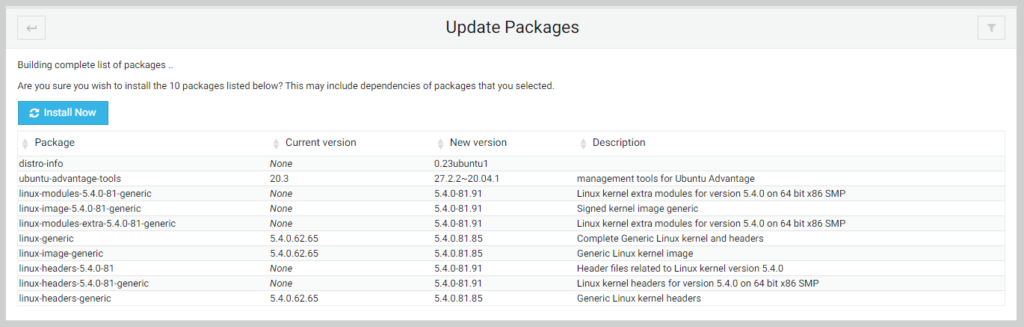
Click the Install Now button.
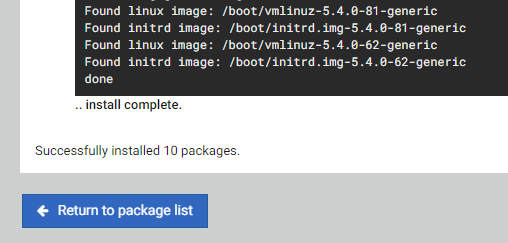
Click the Return to package list button.
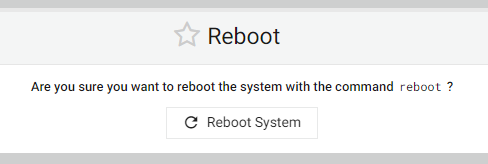
To reboot the machine, on the left navigation, click Bootup and Shutdown.
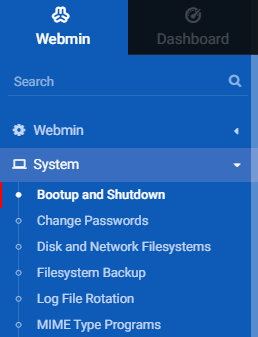
Under the Bootup and Shutdown page, scroll down. Click the Reboot System button.

Click the Reboot System once more.
Command Line
Use an application called Putty.
Login as root and cut the password, and use right-click on the mouse to paste.
Run:
# sudo apt updateNote: If there is stating X packages need to update.
Run:
# sudo apt-get update
# sudo apt-get upgrade
# sudo apt-get dist-upgrade
Reboot
# sudo shutdown -r 0Verify the LAMP installation
MariaDB
By default, the database installation is MariaDB which is forked from Oracle MySQL.
mysql --versionNote: it will show: mysql Ver 8.0.25-0ubuntu0.20.04.1 for Linux on x86_64 ((Ubuntu))
Check MYSQL service is running or not.
sudo systemctl status mysql.serviceNote: Press q to exit
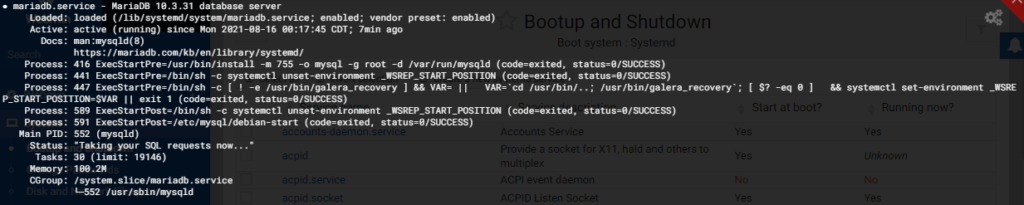
Note: Check the running status by looking at
Active: active (running)
If it is not active (running), run to start:
sudo systemctl start mysql.serviceChange the MariaDB root password:
sudo mysqladmin --user=root --password=currentpassword password "newpassword"Test the new password:
mysql -u root -pUnder MariaDB console, to exit:
exit
Apache Web Server
Check the Apache 2 status:
sudo systemctl status apache2Note: Press q to exit
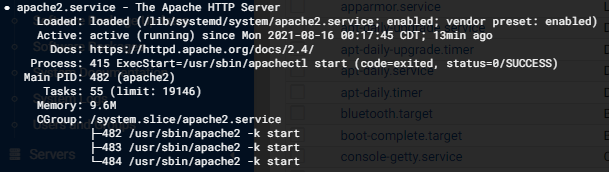
Note: Check the running status by looking at
Active: active (running)
If it is not running:
sudo systemctl start apache2PHP and Extensions
sudo php --versionUsers
Root Password
To set a root password, open a terminal window and execute the following sudo command. First, you need to enter your user password ( given that you are part of the sudo administration group ), after which enter and retype a new root password :
# sudo passwd rootYou should now be ready to log in with a new root password. Try it now:
# su
password:
Use the whoami command to confirm that you are logged in as a root user:
# whoami
root
Add Sudo User
To create another sudo user:
# adduser testuserEnter and retype the password. Enter the name and relevant information.
Add the new user to the sudo group:
# adduser testuser sudoAdd Super User Account for MariaDB
Access the MariaDB command line:
# sudo mysql -u root -pCreate a new user:
> CREATE USER 'testuser'@'%' IDENTIFIED BY 'testpassword';Grant all permissions to the new MariaDB user account.
> GRANT ALL PRIVILEGES ON *.* TO 'testuser'@'%' WITH GRANT OPTION;
> FLUSH PRIVILEGES;
> EXIT;
Access the MariaDB command line using the new account.
# sudo mysql -u testuser -pVerify the new MariaDB account privileges.
# SHOW GRANTS FOR 'testuser';SSH
Change SSH Server Port
Open up the Webmin via URL with standard port.
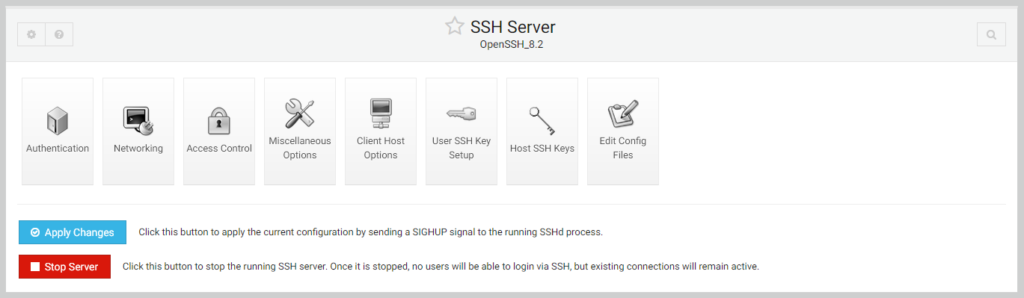
Expand servers and select SSH server from the leftmost side of the Webmin control panel and click on the edit config files option:

Un-comment the port option from the configuration file set a new port number value here, and click the save option.
Then click the apply changes button to apply the current configuration by sending a SIGHUP signal to the running SSHd process.
Webmin
Change Webmin Port
If you need it from the Webmin portal, it requires installing libsocket6-perl:
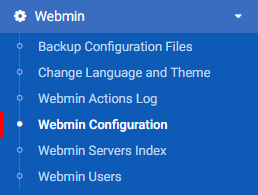
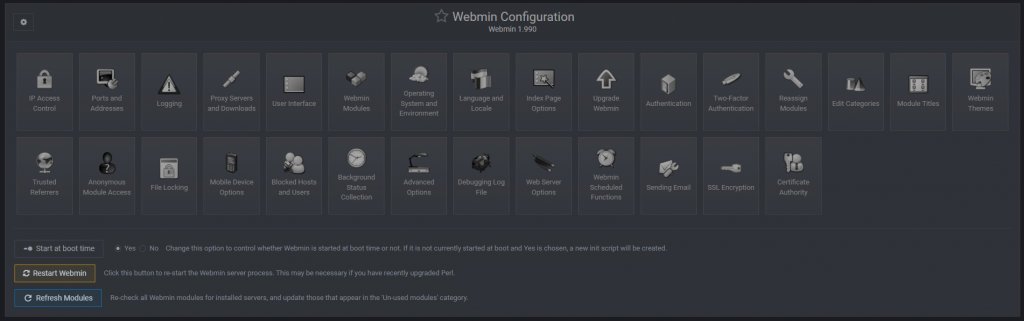
apt-get install libsocket6-perlOpen up the Webmin via URL with standard port 10000. On the left-hand side, expand the Webmin and select the Webmin Configuration option.
On the Webmin configuration, change the port accordingly:
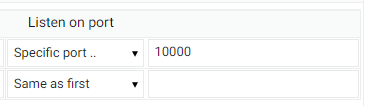
Click the Save button.
Stop/Start/Restart Webmin
To stop the server:
sudo /etc/webmin/stopTo start the server:
sudo /etc/webmin/startTo restart the server:
sudo /etc/webmin/restartAntiVirus
Install ClamAV
Once logged into your Ubuntu 20.04 server, run the following command to update your base system with the latest available packages.
# sudo apt-get update -yBy default, the ClamAV package is available in the Ubuntu 20.04 default repository. You can install it with the following command:
# sudo apt-get install clamav clamav-daemon -yBefore updating the database, you will need to stop the clamav-freshclam service. You can stop it with the following command:
# sudo systemctl stop clamav-freshclamUpdate the database using the following command:
# sudo freshclamStart the clamav-freshclam service and enable it to start at system reboot with the following command:
# sudo systemctl start clamav-freshclam
# sudo systemctl enable clamav-freshclam
By default, freshclam stores all databases inside /var/lib/clamav/ directory. You can list them with the following command:
# sudo ls /var/lib/clamav/Get the following output:
bytecode.cvd daily.cvd main.cvd
Clamscan scans files and directories for viruses and deletes them immediately. The basic syntax of Clamscan is shown below:
# clamscan [options] [files-or-directories]A brief explanation of the most commonly used options are shown below:
- –infected : This option display a list of all infected files.
- –remove : This option removes all infected files from your system.
- –recursive : This option will scan all directories and sub-directories.
For example, you can scan the /etc directory with the following command:
# sudo clamscan --infected --remove --recursive /etcYou can print all available options with clamscan using the following command:
# sudo clamscan -hSetup the daily scan and create an SH file called: clamav-freshclam-scan.sh
#!/bin/bash
SCAN_DIR="/"
LOG_FILE="/var/log/clamav/daily_clamscan.log"
/usr/bin/clamscan -i -r $SCAN_DIR >> $LOG_FILE

Give execute permission.
Intrusion Prevention via Fail2ban
The Fail2ban package is included in the default Ubuntu 20.04 repositories. To install it, enter the following command as root or user with sudo privileges:
# sudo apt update
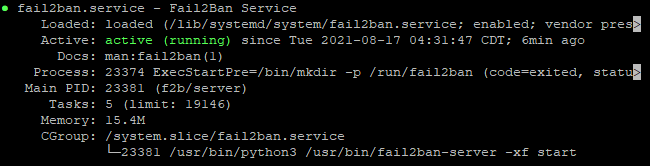
# sudo apt install fail2banOnce the installation is completed, the Fail2ban service will start automatically. You can verify it by checking the status of the service:
# sudo systemctl status fail2banThe output will look like this:
The default Fail2ban installation comes with two configuration files, /etc/fail2ban/jail.conf and /etc/fail2ban/jail.d/defaults-debian.conf. It is not recommended to modify these files as they may be overwritten when the package is updated.
Fail2ban reads the configuration files in the following order. Each .local file overrides the settings from the .conf file:
/etc/fail2ban/jail.conf/etc/fail2ban/jail.d/*.conf/etc/fail2ban/jail.local/etc/fail2ban/jail.d/*.local
For most users, the easiest way to configure Fail2ban is to copy them jail.conf to jail.local and modify the .local file. More advanced users can build a .local configuration file from scratch. The .local file doesn’t have to include all settings from the corresponding .conf file, only those you want to override.
Create a .local configuration file from the default jail.conf file:
# sudo cp /etc/fail2ban/jail.{conf,local}To start configuring the Fail2ban server, open the jail.local file with your text editor:
# sudo nano /etc/fail2ban/jail.localThe file includes comments describing what each configuration option does. In this example, we’ll change the basic settings.
Whitelist IP Addresses
IP addresses, ranges, or hosts you want to exclude from banning can be added to the ignoreip directive. Here you should add your local PC IP address and all other machines you want to whitelist.
Uncomment the line starting with ignoreip and add your IP addresses separated by space:
ignoreip = 127.0.0.1/8 ::1 123.123.123.123 192.168.1.0/24
Ban Settings
The values of bantime, findtime, and maxretry options define the ban time and ban conditions.
bantime is the duration for which the IP is banned. When no suffix is specified, it defaults to seconds. By default, the bantime value is set to 10 minutes. Generally, most users will want to set a longer ban time. Change the value to your liking:
bantime = 1dTo permanently ban the IP, use a negative number.
findtime is the duration between the number of failures before a ban is set. For example, if Fail2ban is set to ban an IP after five failures (maxretry, see below), those failures must occur within the findtime duration.
findtime = 10mmaxretry is the number of failures before an IP is banned. The default value is set to five, which should be fine for most users.
maxretry = 5Email Notifications
Fail2ban can send email alerts when an IP has been banned. To receive emails, you need to have an SMTP installed on your server and change the default action, which only forbids the IP to %(action_mw)s, as shown below:
action = %(action_mw)s%(action_mw)s bans the offending IP and sends an email with a whois report. If you want to include the relevant logs in the email, set the action to %(action_mwl)s. You can also adjust the sending and receiving email addresses:
destemail = [email protected]sender = [email protected]
Fail2ban Jails
Fail2ban uses the concept of jails. A jail describes a service and includes filters and actions. Log entries matching the search pattern are counted, and the corresponding actions are executed when a predefined condition is met.
Fail2ban ships with some jail for different services. You can also create your jail configurations.
By default, only the ssh jail is enabled. To enable a jail, you need to add enabled = true after the jail title. The following example shows how to allow the proftpd jail:
[proftpd]enabled = true port = ftp,ftp-data,ftps,ftps-datalogpath = %(proftpd_log)sbackend = %(proftpd_backend)s
Note: The ProFTP needs to be installed first – see this section.
The settings we discussed in the previous section can be set per jail. Here is an example:
[sshd]enabled = truemaxretry = 3findtime = 1dbantime = 4wignoreip = 127.0.0.1/8 23.34.45.56
The filters are located in the /etc/fail2ban/filter.d directory, stored in a file with the same name as the jail. You can fine-tune the filters if you have a custom setup and experience with regular expressions.
Each time you edit a configuration file, you need to restart the Fail2ban service for changes to take effect:
# sudo systemctl restart fail2banFail2ban Client
Fail2ban ships with a command-line tool named fail2ban-client which you can use to interact with the Fail2ban service.
To view all available options, invoke the command with the -h option:
# fail2ban-client -hThis tool can ban/unban IP addresses, change settings, restart the service, and more. Here are a few examples:
Check the jail status:
# sudo fail2ban-client status# sudo fail2ban-client status sshdUnban an IP:
sudo fail2ban-client set sshd unbanip 23.34.45.56Ban an IP:
sudo fail2ban-client set sshd banip 23.34.45.56Web Server and Websites
Disable the PHPinfo.php file
On Webmin, under Tools > File Manager. Find this file on /var/www/html/info.php and rename to info.php.bak
Modify the PHP.INI
Open the php.ini file located on /etc/php/7.4/fpm/
Find the following entries and change them to:
upload_max_filesize = 128Mpost_max_size = 128Mmax_execution_time = 600max_input_vars = 2000
Run the following reload and then restart.
$ sudo systemctl start php7.4-fpm.service # <- start
$ sudo systemctl stop php7.4-fpm.service # <- stop it
$ sudo systemctl restart php7.4-fpm.service # <- restart it
$ sudo systemctl reload php7.4-fpm.service # <- reload it
Configure Website with SSL
Create website folder structure as follow on /etc/www/test-domain.com/
/etc/www/test-domain.com/backups/
/etc/www/test-domain.com/public_html/
To avoid any permission issues, we can change the ownership of the domain document root directory to the apache user (www-data) :
# sudo chown -R www-data: /var/www/test-domain.com/public_htmlEnable the SSL module in Apache
# sudo a2enmod sslEnabled the Rewrite module
sudo a2enmod rewriteRestart the Apache.
systemctl restart apache2Create this file called test-domain.com.conf in /etc/apache2/sites-available folder.
Copy this content:
<VirtualHost *:80>

    ServerAdmin [email protected]
    ServerName test-domain.com
    ServerAlias www.test-domain.com
    DocumentRoot /var/www/test-domain.com/public_html

    <Directory /var/www/test-domain.com/public_html>
        Options Indexes FollowSymLinks
        AllowOverride All
        Require all granted
    </Directory>

    ErrorLog ${APACHE_LOG_DIR}/error.log
    CustomLog ${APACHE_LOG_DIR}/access.log combined

    RewriteEngine on
    RewriteCond %{SERVER_NAME} =test-domain.com [OR]
    RewriteCond %{SERVER_NAME} =www.test-domain.com
    RewriteRule ^ https://%{SERVER_NAME}%{REQUEST_URI} [END,NE,R=permanent]

</VirtualHost>

<VirtualHost *:443>

    ServerAdmin [email protected]
    ServerName test-domain.com
    ServerAlias www.test-domain.com
    DocumentRoot /var/www/test-domain.com/public_html

    <Directory /var/www/test-domain.com/public_html>
        Options Indexes FollowSymLinks
        AllowOverride All
        Require all granted
    </Directory>

    ErrorLog ${APACHE_LOG_DIR}/error.log
    CustomLog ${APACHE_LOG_DIR}/access.log combined

    SSLEngine on
    SSLCertificateFile /etc/cloudflare/test-domain.com.pem
    SSLCertificateKeyFile /etc/cloudflare/test-domain.com.key

</VirtualHost>
Note:
The Cloudflare public and private keys need to be loaded on the server.
We have to include this code below; otherwise, Rewrite won’t work
<Directory /var/www/test-domain.com/public_html>
        Options Indexes FollowSymLinks
        AllowOverride All
        Require all granted
    </Directory>
Copy info.php from /etc/www/html into /etcc/www/test-domain.com/public_html/
Activate the test-domain site
# sudo a2ensite test-domain.com.confRun the command to reload:
sudo systemctl reload apache2Test the website by going to https://test-domain.com
Remove the info.php once it is OK.
Upgrading the PHP from 7.4 to 8.1
Go to the console:
To find out which version of PHP you are currently using, run:
php -vUpgrading from PHP 7.x to PHP 8.x involves upgrading the PHP core and extensions. For example, if you use the PHP extension cURL, you must manually install the PHP 8 version at the end of this guide.
dpkg -l | grep php | tee packages.txtCopy your results into a text file and keep it safe if you need to install the PHP 8 packages later.
In our case, we need to keep the PHP version handy as we found that one website can’t use PHP 8 due to a legacy WordPress template. So we do NOT uninstall PHP 7.4 and its extension.
See the article from DevAnwe.rs – How to Upgrade from PHP 7.x to PHP 8 on Ubuntu | DevAnswe.rs
sudo apt update
sudo apt upgrade
To install PHP 8.x, you can add Ondřej Surý’s PPA, which has the PHP 8 packages:
sudo apt install -y software-properties-common
sudo add-apt-repository ppa:ondrej/php
sudo apt update
Next, install PHP 8.1:
sudo apt install -y php8.1
Verify the installation:
php8.0 -v
php -v
Remember that changing the PHP CLI version does not change the version your web server uses. To use different PHP versions for different websites, you can use PHP-FPM (that’s why we used it) to handle this per site.
Install PHP 8 extensions:
sudo apt install php8.1-common php8.1-mysql php8.1-xml php8.1-xmlrpc php8.1-curl php8.1-gd php8.1-imagick php8.1-cli php8.1-dev php8.1-imap php8.1-mbstring php8.1-opcache php8.1-soap php8.1-zip php8.1-intl -yAs we use PHP-FPM, install the FPM:
sudo apt install php8.1-fpm -y

sudo a2enmod proxy_fcgi setenvif

sudo a2enconf php8.2-fpm

sudo systemctl reload apache2
Restart the Apache and start PHP-FPM 8.1 service:
sudo systemctl restart apache2 && sudo service php7.4-fpm restartCheck the service running:
ps -efH | grep php-fpm
Then add the sock file on /etc/php/8.1/fpm/pool.d/ based on www.conf for each site.
Change the site’s detail for Apache on /etc/apach2/sites-available/ for each site, especially:
Under VirtualHost:
<IfModule mod_fcgid.c>
    Options +ExecCGI
    FcgidConnectTimeout 20
    Alias /php8-fcgi /usr/lib/cgi-bin/php8-fcgi

    <FilesMatch \.php$>
        SetHandler "proxy:unix:/run/php/php8.2-fpm.sock|fcgi://localhost"
    </FilesMatch>
</IfModule>
Tested the site and checked the PHP version either via phpinfo or WordPress Tools and Server
Upgrading the PHP from 8.1 to 8.2
As the PHP 8 packages have been added, there is an update from Webmin for PHP 8.2 automatically. Checked the directory.
In this case, install the additional packages and php-FPM part and start the service.
Databases
Tuning MariaDB
NOTE: At this point, we only apply these on Development/Testing VMs. We are not used to production as yet.
Linux Kernel Settings – IO Scheduler
Most people are advised to use [noop] or [deadline] as recommended. As the new kernel and VM are related, the [none] seems the way to go.
To check:
# sudo cat /sys/block/sda/queue/schedulerNote: You will see: [none] mq-deadline
The bracket [none] means being selected.
Resources Limits – Open Files Limit
Linux usually limits the number of file descriptors each process can open. This limit can easily exceed or impact performance for an active DB system. This system, by default, sets to 1024.
To check:
# ulimit -Sn
# ulimit -Hn
Noted down both values. Make the lower value the same as the high value.
Add the following on /etc/security/limits to increase the limit.conf
mysql soft nofile65535mysql hard nofile65535
These limits will be applied after reboot. There is another way to use the changes without rebooting. Check: https://superuser.com/questions/740000/modify-and-apply-limits-conf-without-reboot
Resource Limits – Core File Size
Linux limits the size of core files, as seen in the previous case. Again this has a soft and hard limit, and by default soft limit is set as 0, which effectively disables core file generation. To allow core file generation (other configurations needed for core dump generation), we can increase this value in /etc/security/limits.conf as:
mysql soft core unlimitedmysql hard core unlimited
After the system reboot, mysql the user would be able to see the new values using ulimit command as:
# ulimit -Sc
# ulimit -Hc
Configure Swappiness
[NOTE: I don’t do this one yet]
Swappiness value in Linux determines how likely the system is to swap a page from memory to swap space configured on the system. Usually, the default value is set as 60, which can be checked from:
sysctl vm.swappinessIts value can range from 0 to 100, where a lower value means a lower likeliness of swapping. On a database server running only MariaDB, we would want to reduce this value to 0 to avoid using swap as much as possible. Do note here that setting swappiness value of 0 should be done with caution, considering other system design factors. In case of high memory usage or I/O load, the kernel might kill the Out Of Memory (OOM) process.
Since a low swappiness setting is recommended for database workloads and, as such, for MariaDB databases, it is recommended to set swappiness to a value of 1. You can add the below line in /etc/sysctl.confto make this change persistent:
vm.swappiness = 1The changes will take effect after the system reboot though you can always do it in advance using sysctl command:
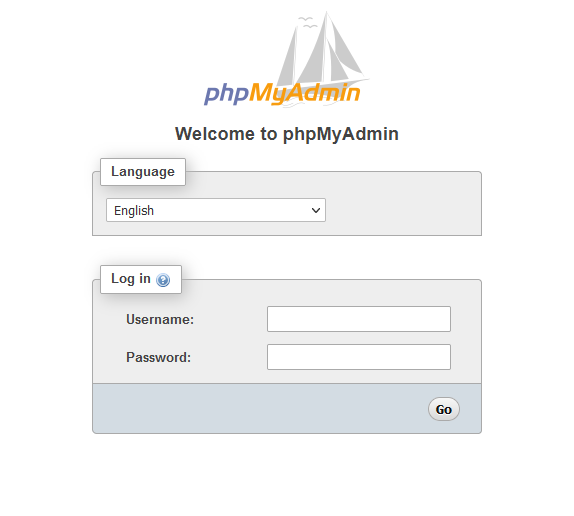
sysctl -w vm.swappiness=1Configure PHPMyAdmin
By default, the PHPMyAdmin is already installed as a part of the image.
On Webmin, under Tools > File Manager. Find this file on /etc/phpmyadmin/config.inc.php
Enter the following code at the last of that page.
$cfg['ForceSSL'] = true;
Activate the default-ssl site
# sudo a2ensite default-ssl.confRun the command to reload:
systemctl reload apache2Tested the PHPMyAdmin page by opening up your browser:
https://{test_domain.com}/phpmyadmin
To disable the phpmyadmin module:
sudo a2disconf phpmyadmin.confRun the command to reload:
systemctl reload apache2To enable the phpmyadmin module:
sudo a2enconf phpmyadmin.confRun the command to reload:
systemctl reload apache2Create Database
Log in to the console using Putty as a superuser
Run:
# mysql -u root -pEnter the password.
Create the database.
> CREATE DATABASE `test-domaincomdb`;Create the user.
> CREATE USER 'test-domaincomusr' IDENTIFIED BY 'mypassword';Grant permissions to access and use the MySQL/MariaDB server. Only allow access from localhost (this is the most secure and common configuration you will use for a web application):
> GRANT USAGE ON *.* TO 'test-domaincomusr'@localhost IDENTIFIED BY 'mypassword';To enable access (OPTIONAL) to the MySQL/MariaDB server from any other computer on the network:
> GRANT USAGE ON *.* TO 'test-domaincomusr'@'%' IDENTIFIED BY 'mypassword';Grant all privileges to a user on a specific database.
> GRANT ALL privileges ON `test-domaincomdb`.* TO 'test-domaincomusr'@localhost;As in the previous command, if you want the user to work with the database from any location, you will have to replace localhost with ‘%’.
Apply changes made.
> FLUSH PRIVILEGES;Verify your new user has the correct permissions.
> SHOW GRANTS FOR 'test-domaincomusr'@localhost; Suppose you made a mistake at some point. In that case, you can undo all the steps above by executing the following commands, taking the precaution of replacing localhost with ‘%’ if you also changed it in the previous commands:
DROP USER test-domaincomusr@localhost;
DROP USER test-domaincomusr@%;
DROP DATABASE test-domaincomdb;
Login to https://{test-domain.com}/phpmyadmin
Login as MariaDB root or any superuser
Check the database.
Add the database name
Export the database
To export the database:
mysqldump -u username -p database_name > database-backup.sqlExtract the database
Sometimes you need to extract the .sql.gz file format. To do this:
gzip -d database-backup.sql.gzImport the database
To import:
mysql -u username -p new_database < database-backup.sqlFTP
Install ProFTPD
We disabled this service as no longer needed. Transferring file can be done via Webmin.
Open up the Webmin.
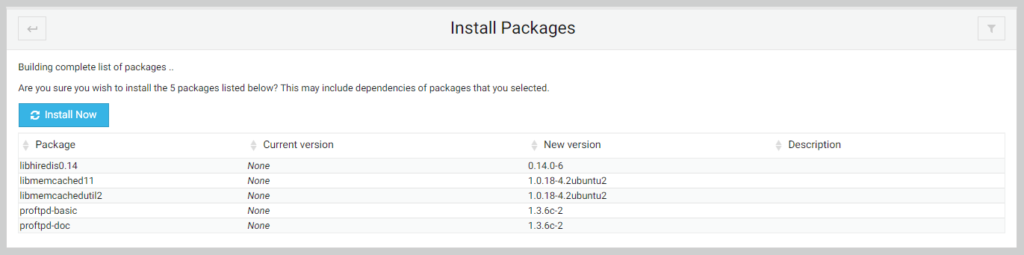
Under the Search, type in FTP. Select the ProFTPD Server option.
On the ProFTPD Server page, click the Install Now button.

Click the Install Now button again.
Mail Server
Install Profix
Open up the Webmin.
Under the Search, type in Mail. Select the Profix Mail Server option.
On the Profix Mail Server page, click the Install Now button.
Test the sending email by going to Webmin and Webmin Configuration option.
Select the Sending Email option.
On the “Send message to” field, enter the email address.
Click the Send Email button.

Check the email to see whether it was received or not.
Using the Cron jobs, the cron job will send a notification via email internally. To check this, click the User Mailboxes options.
Review the list, and if there is an email, it will show this next to the username.
Testing Mailgun
Install Swaks – it is an SMTP of CURL:
curl http://www.jetmore.org/john/code/swaks/files/swaks-20130209.0/swaks -o swaksSet the permissions for the script so you can run it:
chmod +x swaksIt’s based on Perl, so install Perl
sudo apt-get -y install perlTest the sending:
./swaks --auth \
        --server smtp.mailgun.org \
        --au postmaster@YOUR_DOMAIN_NAME \
        --ap 3kh9umujora5 \
        --to [email protected] \
        --h-Subject: "Hello" \
        --body 'Testing some Mailgun awesomness!'
Backups
System Backup via Webmin
This will back up specific system folders into /backups/system. Then it will have another job to backup to FTP Storage. See the FTP backup below.
Create a backup structure:
/backups/system
Run the Webmin on the browser.
Go to System > Filesystem backup
Create a backup:

Set directories to backup:
/etc
/home
/opt
/root
/scripts
/srv
/usr/local
/var
Ensure all the folders especially such as /scripts
Under the Backup, ensure to put the folder and file name, i.e. /backups/system/system_backup.tar.gz
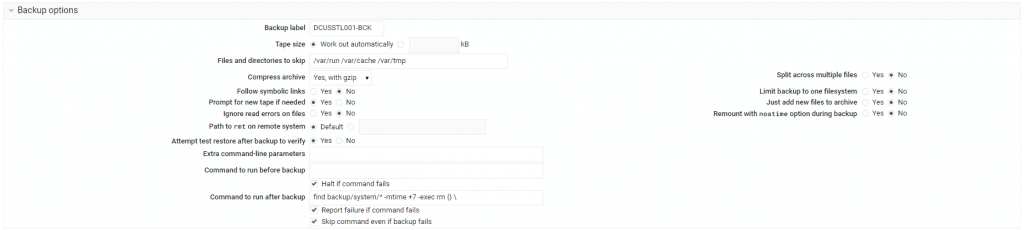
Click the Save button.
SQL Backup
Creating manual backups in a production environment can be tedious. Luckily, there is a Utility called Automysqlbackup that we can download from Ubuntu’s repository. The package uses cron jobs to schedule backups at different intervals without manual intervention.
To download the utility, run the command below:
# sudo apt-get install automysqlbackupThen to take on-demand backups, run the command below:
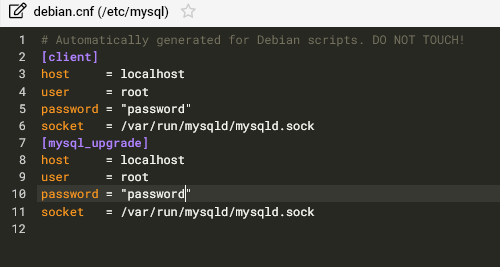
# sudo automysqlbackupNote: If you get an access denied error, you need to enter on MySQL username and password on: /etc/mysql/debian.cnf. Ensure to double-quote the password.
You can list the content of the daily backup folder by running the command below:
# sudo ls -a /var/lib/automysqlbackup/dailyYou can customize Automysqlbackup utility by editing its configuration file located at “/etc/default/automysqlbackup” by running the command below:
# sudo nano /etc/default/automysqlbackupThe utility organises the MySQL backup files under the “/var/lib/automysqlbackup” directory.
AutoMySQLBackup
This will backup the “/var/default/automysqlbackup” folder into “/backups/automysqlbackup”. Then it will have another job to backup to FTP Storage. See the FTP backup below.
Create a backup structure:
/backups/automysqlbackup
Create bash file – automysqlbackup-backup.sh under /scripts :
#!/bin/bash
#----------------------------------------
# OPTIONS
#----------------------------------------
DAYS_TO_KEEP=7    # 0 to keep forever
SOURCE_PATH='/var/lib/automysqlbackup'
BACKUP_PATH='/backups/automysqlbackup'
#----------------------------------------

# Create the backup folder
if [ ! -d $BACKUP_PATH ]; then
  mkdir -p $BACKUP_PATH
fi

cd "$SOURCE_PATH"
if [ "$(pwd)" != "$SOURCE_PATH" ] ; then
  echo "Failed to change directory to root of source path"
  exit
fi

for folder in * ; do
  if [[ -d $folder && ! -L "$folder" ]]; then
    echo "Found folder folder: $folder"
    date=$(date -I)
    tar -cvpzf $BACKUP_PATH/$date-$folder.tar.gz $folder
  fi
done

# Delete old backups
if [ "$DAYS_TO_KEEP" -gt 0 ] ; then
  echo "Deleting backups older than $DAYS_TO_KEEP days"
  find $BACKUP_PATH/* -mtime +$DAYS_TO_KEEP -exec rm {} \;
fi
Make the script executable with the following command:
sudo chmod +x automysqlbackup-backup.shWWW Backups
This will backup /var/www folder into /backups/www. Then it will have another job to backup to FTP Storage. See the FTP backup below.
Create a backup structure:
/backups/www
Create bash file – www-backup.sh under /script
#!/bin/bash
#----------------------------------------
# OPTIONS
#----------------------------------------
DAYS_TO_KEEP=7    # 0 to keep forever
WWW_PATH='/var/www'
BACKUP_PATH='/backups/www'
#----------------------------------------

# Create the backup folder
if [ ! -d $BACKUP_PATH ]; then
  mkdir -p $BACKUP_PATH
fi

# change into the web root directory
cd "$WWW_PATH"
if [ "$(pwd)" != "$WWW_PATH" ] ; then
  echo "Failed to change directory to root of web path"
  exit
fi

for website in * ; do
  if [[ -d $website && ! -L "$website" ]]; then
    echo "Found website folder: $website"
    date=$(date -I)
    tar -cvpzf $BACKUP_PATH/$date-$website.tar.gz $website
  fi
done

# Delete old backups
if [ "$DAYS_TO_KEEP" -gt 0 ] ; then
  echo "Deleting backups older than $DAYS_TO_KEEP days"
  find $BACKUP_PATH/* -mtime +$DAYS_TO_KEEP -exec rm {} \;
fi
Make the script executable with the following command:
sudo chmod +x www-backup.shFTP Backups
This will back up the /backups folder into the FTP site via lftp command. Install the lftp component as it has mirror functionality – easy to copy folder via FTP.
Create bash file – script-ftp.sh under /script :
TODAY=$(date --iso)
RMDATE=$(date --iso -d '7 days ago')
HOST=backup.test-domain.com
USER=testusername
PASSWORD=testpassword
lftp -u $USER,$PASSWORD $HOST << EOF
rm -r /backups/${TODAY}
mkdir /backups/${TODAY}
cd /backups/${TODAY}
lcd /backups
mirror -R
rm -r /backups/${RMDATE}
bye
EOF
Make the script executable with the following command:
sudo chmod +x script-ftp.shTo check the size of the folder on FTP:
lftp -u testusername,testpassword backup.test-domain.com

du -h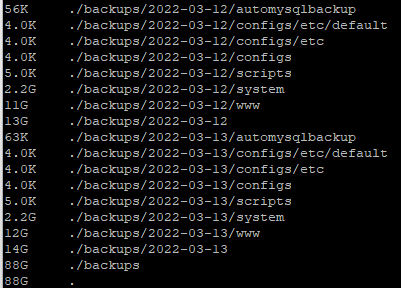
Note: See the last entry “.” and that will be the total folder size
Rsync
The requirement is to have two identical servers – with the same OS. Let’s say we called the source server and target server. In our case, we do cross-synchronisation meaning the source server will sync to the target server, and the target server will sync to the source server.
As the blog is written, there was an issue with copying some files (www-data ownership with 600 permission on Wordfence wflog folder) using anotherroot user as sudo. We found that due to conflicting with Lockdown SSH Logins with No Password. We have to lowered down the security by allowing root, however, we still implemented the key pair between two servers. There is a still have a safety which is no password implemented and the keypair only distributed between 2 servers.
Log in to the source server as anotherroot account, to install:
sudo apt-get install -y rsyncIf you lock down SSH login without a password – https://dewapost.com/2022/03/19/how-to-hardening-the-ubuntu-server/, you need to undo this to:
PermitRootLogin yes
PasswordAuthentication yes
On the source server, then create a keygen for the root user:
su root
ssh-keygen -q -P ""
Note: This will create key pair files under /root/.ssh/
On the source server, then copy the id to the target server:
ssh-copy-id -p 222 root@ip-target-serverOn the target server, do the same process as above (under the lockdown SSH, create a key pair, etc, above).
On the target server, check the /root/.ssh/authorised_keys … open this with notepad – usually, it will have two entries (one for the remote local machine and one from the source server)
Create a folder on the target server for the targeted sync:
/var/www_rsync_target/dewapost.com
Back to the Source Server, test the ssh connection to the target server, which should have no password prompt.
ssh -p 222 anotherroot@ip-target-serverEnsure to log out from this. Otherwise, it is confusing which server you logged into.
To sync:
rsync -avP --delete -e "ssh -p 222" /var/www/dewapost.com/ root@ip-target-server:/var/www_rsync_target/dewapost.com/Note: This will copy all /var/www/dewapost.com files to the target server on /var/www_rsync_target/dewapost.com. The –delete command will delete the target server if the files get deleted on the source server. With the -a command, it will copy if the files have changed.
Setup the Cron
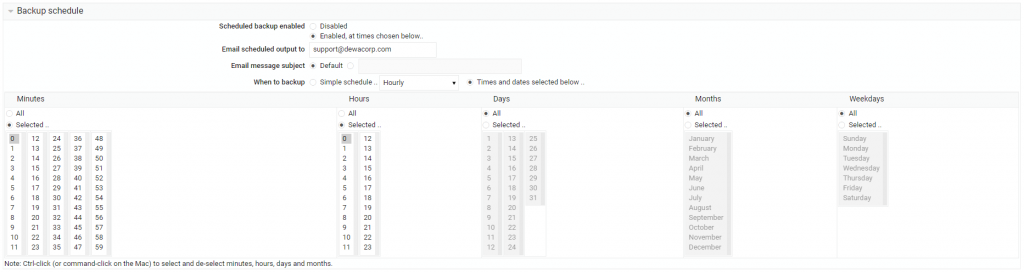
We will open the crontab configuration file using nano for editing purposes. The file is located at /etc/crontab. Run the command below to open it:
# sudo nano /etc/crontabSet to:
0 0 * * * root automysqlbackup
Note:
To find more about the configuration, check this: alibabacloud.com/blog/594117
Monitoring
INotifyWait
TBA
Challenges
- With introducing Rsync between 2 servers, the lockdown SSH Logins with No Password need to be lowered by allowing root access. I need further research.
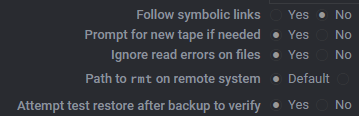
- The Webmin’s Filesystem backup is consistently failed. Not sure what caused this. This backup uses using Perl fsdump script. At the observation stage, it seems it’s related to the setting where “Ignore read errors on files – No”.
The note said: When this option is set to Yes, any errors reading files that should be included in the backup will be ignored. It helps skip the useless error file changes as we read it, but it may mask permission or file corruption problems.
We set it to Yes and waited and see the result.
Troubleshooting
- ERROR 1045 (28000): Access Denied for user ‘root’@’localhost’ (using password: NO) – https://dewapost.com/2022/03/24/troubleshooting-error-1045-28000-access-denied-for-user-rootlocalhost-using-password-no/
- Error: [Fri Jul 30 06:46:14.672690 2021] [proxy_fcgi:error] [pid 45511:tid 140579765737216] [client 120.17.57.82:2657] AH01071: Got error ‘Primary script unknown’
Run: systemctl restart php7.4-fpm systemctl restart apache2
Credits
Install LAMP Stack on Ubuntu
linuxhint.com/install-lamp-stack-ubuntu/
Add an additional Administrator account (similar like root)
coderrocketfuel.com/article/how-to-create-a-new-sudo-user-on-ubuntu-20-04
Install Apache Webserver on Ubuntu
linuxhint.com/install_apache_web_server_ubuntu/
Hosting Website on Ubuntu
linode.com/docs/guides/hosting-a-website-ubuntu-18-04/
Configure Phpmyadmin on Webmin
justwebu.com/install-phpmyadmin-on-webmin-easy-steps.html
Configure CloudFlare Certificate into Apache and Configuring Port 443 and Redirection
devanswers.co/configure-cloudflare-origin-ca-apache/
Configuring a Subdomain in Apache2
codeburst.io/configuring-a-subdomain-in-apache2-f7a8b316b42c
MariaDB and Grant Permission
daniloaz.com/en/how-to-create-a-user-in-mysql-mariadb-and-grant-permissions-on-a-specific-database/
MariaDB Tuning
geekflare.com/mariadb-installation-guide/
MariaDB – Error on Log in Troubleshoot
mariadb.com/kb/en/error-logging-in/
Backup with MySQLDump
https://mariadb.com/kb/en/making-backups-with-mysqldump/
Webmin-cron
https://bobcares.com/blog/webmin-cron/
Install Clam AntiVirus
atlantic.net/vps-hosting/how-to-install-clamav-on-ubuntu-20-04-and-scan-for-vulnerabilities/
Install Fail2Ban
linuxize.com/post/install-configure-fail2ban-on-ubuntu-20-04/
Fail2Ban – Change the SSH port related
outhereinthefield.wordpress.com/2019/02/13/fail2ban-ufw-and-sshd-with-custom-port-on-ubuntu/
Fail2Ban – Unban IP
https://bobcares.com/blog/fail2ban-unban-ip/
Install UFW
digitalocean.com/community/tutorials/how-to-set-up-a-firewall-with-ufw-on-ubuntu-20-04
Change the Webmin port
iodocs.com/change-webmin-port-using-terminal/
Schedule backup
https://graspingtech.com/schedule-backup-websites-hosted-ubuntu-16-04/
Backup Files to Remote FTP
https://broexperts.com/how-to-backup-files-to-a-remote-ftp-server-with-bash-script/
Check crontab log
https://fedingo.com/how-to-check-crontab-logs-in-linux/
Create a backup in Linux with Webmin
https://www.youtube.com/watch?v=O7dIflcK7QA
Monitor Changes Directory Tree
https://www.baeldung.com/linux/monitor-changes-directory-tree
How to Run Script on Startup
https://linuxconfig.org/how-to-run-script-on-startup-on-ubuntu-20-04-focal-fossa-server-desktop
The End
If you have reached the end of this article, congratulation. Hopefully, I have highlighted what you need to know to set up and configure Contabo VPS.
*** Let's Discuss ***
I also would love to hear about how you deal with the situation and what IT-related challenges you might be facing. Please feel free to leave us a comment below this article or you can contact us on the Dewacorp website for your IT support, application integration, application development, or other IT-related. Alternatively, you can casually have a discussion on Dewachat. Let us know if you have any questions that we can help with!
I write this so that this is not a fixed article. Like in this journey, I learn as I go, and I re-write some parts of the article, so please keep pinging with this article or any tech posts.
Big thank you for the photo by Negative Space from Pexels.
 *** Take a Look ***
To boost your product and service to the broader web community, you can visit our Dewalist classified website – home to 36,000+ active users and 51,000+ one year of active advertising so far.
If you like this post, please check out our other related posts:
- How to Install and Configure Kasm Workspaces on Ubuntu
- How to Enable Remote Access to MariaDB Database
- How to Install the Webmin on Ubuntu 20.04
- How to Install and Configure OpenVPN on Ubuntu
- Troubleshoot for not being able to Receive a Test Email from Webmin on a particular Domain
- Troubleshooting ERROR 1045 (28000): Access denied for user ‘root’@’localhost’ (using password: NO)
- How to Harden the Ubuntu Server in 2022
*** Try it Out ***
To solve, maintain and monitor Search Engine Optimisation (SEO) and other web challenges, check out our Dewagear tools website – home to 50+ tools so far.
If you love this article or any tech posts and you would like to receive an update of this article or our latest post, please sign up for the form below: