


How to Harden the Ubuntu Server in 2022

Background
As I wrote the blog – A Complete Setup Guide for Contabo VPS Ubuntu 20.04 with preinstalled Webmin + LAMP previously, my next step is to harden this server from the attackers.
We also started using more internal cloud-based applications to host our website and applications. We compiled a blog post about how to secure Ubuntu and ensure it’s appropriately hardened against cyber-attacks.
It’s important to note that even with the steps described above, it’s impossible to prevent all cyber-attacks against a website. The most practical thing we can do is mitigate the risks as much as possible by following best practices and implementing additional security measures.
Solution
Here is the setup:
- Enabling Automatic Updates
- Creating Login Other than Root in SSH
- Removing the Use of Password in SSH
- Lockdown SSH Logins with No Password
- Changing the SSH Port
- Activating the Firewall
- Only Allow the Port if you need access, and give internal access
- Blocking the Ping
- Changing the Webmin Port
- Starting the Webmin Service if only Needed
- Setting up Two-Factor Authentication in Webmin
- Checking the PHP version
- Updating the PHP configuration
Enabling Automatic Updates
@@@@@@@@@@@@@@@@@@@@@@@@@@@@@@@@@@@@@@@@@@@@@@@@@@@@@@@@@@@ @ WARNING: REMOTE HOST IDENTIFICATION HAS CHANGED! @ @@@@@@@@@@@@@@@@@@@@@@@@@@@@@@@@@@@@@@@@@@@@@@@@@@@@@@@@@@@
You need to remove the 3 lines associated with the IP address on the .ssh folder on your client machine.
The servers need to be patched. If you don’t patch your server, it will likely be hacked. To update your server manually can be challenging, but some commands make it easy to keep track of what needs to be updated regularly.
To update the server manually:
sudo apt updateTo install the update:
sudo apt dist-upgradeTo install the automatic update utility:
sudo apt install unattended-upgradesTo setup:
sudo dpkg-reconfigure --priority=low unattended-upgradesThe GUI pops up. For the Automatically download and stable updates option, select the Yes button.
Creating Login Other than Root in SSH
Login SSH using root is something that you need to avoid.
To do this, create another user called, let say anotherroot and give this is administrator access (sudo group).
adduser anotherrootEnter the password. Enter the profile questions.
Add the user to the sudo group:
usermod -aG sudo anotherrootLogged out from the terminal.
Try login the new user:
ssh [email protected]To test the without a sudo:
adduser anotherroot2This will show the command not found!!!
To try with a sudo:
sudo adduser anotherroot2This should prompt a password and the test user will get created.
Removing the Use of Password in SSH
Password can be brute-forced. So to avoid this, we use the authentication key pair instead (the public and private keys). On the server, we will give the public key while on the client (laptop/desktop) we use the private key.
The analogy will be the public key is a padlock while the private key is a key.
Log in to the anotherroot user on the terminal (Powershell or any)
ssh [email protected]Create a folder:
mkdir ~/.ssh && chmod 700 ~/.sshThis command will create a folder called .ssh under the home directory – /home/anotherroot where the public key will be stored and give the right permission.
Log out:
logoutBack to the terminal (Powershell / Linux Shell) and create the pair:
ssh-keygen -b 4096The question pops up. Enter file in which to save the key (C:\Users\[your_windows_user]/.ssh/id_rsa):
Leave the default and press enter.
Enter a passphrase or you can leave it blank.
The 2 keys should be created under C:\Users\[your_windows_user]\.ssh\id_rsa and C:\Users\[your_windows_user]\.ssh\id_rsa.pub
To verify the key-pair, still under the terminal:
sudo cd .ssh
sudo ls
Back up these key pairs to somewhere save ie. your password library.
The next step is to upload the public key into the server, still on the terminal:
scp -P XXX $env:USERPROFILE/.ssh/id_rsa.pub [email protected]:~/.ssh/authorized_keysTry now the login and this should not prompt a password:
ssh [email protected]Straight in without a password!!!
Lockdown SSH Logins with No Password
Log in to the server using anotherroot:
sudo nano /etc/ssh/sshd_configGo to the line and replace the line:
PermitRootLogin yes

with
PermitRootLogin no
Go to the line and replace the line:
PasswordAuthentication yes
PasswordAuthentication no
To save the document, press Ctrl + X and press Y, and enter.
Restart the ssh server:
sudo systemctl restart sshdTo test it, leave the current terminal, just in case.
Open another terminal to test with the root account:
ssh [email protected]This account should not be logged in – permission denied (public key).
Changing the SSH Port
Log in to the server using anotherroot:
sudo nano /etc/ssh/sshd_configReplace the line:
#Port 22
with something other than 22 and in this case 222 for instance
Port 222
Replace the line:
#AddressFamily any
with allowing IPv4 only:
AddressFamily inet
To save the document, press Ctrl + X and press Y, and enter.
Restart the ssh server:
sudo systemctl restart sshdTo test it, leave the current terminal open, just in case.
Open another terminal to test:
ssh [email protected] This account should be a connection timeout.
Test again with custom port – 222:
ssh [email protected] -p 222Activating the Firewall
Putting a firewall or a fence up around the perimeter, it will make the server more secure.
Start the terminal (Powershell) and login into the server
ssh [email protected] -p 222To see what port is being opened (listened to):
sudo ss -tuplnThere should be a list and check out the Local Address.Port heading.

If your current server has a long list, please document and do some research about the port.
To install the firewall:
sudo apt install ufwTo see the status:
sudo ufw statusThis should be inactive.
Before activating this, the first requirement is to allow SSH with a custom port first.
sudo ufw allow 222The rules should be updated (ipv4 and ipv6)
The following command will activate the firewall. This will block everything except the custom port.
To activate the firewall, enter:
sudo ufw enablePress Y and the firewall should be active and enabled.
To check the status:
sudo ufw statusYou should be to see To / Action / From only for that port 222
To test it, leave the current terminal open, just in case.
Open another terminal to test:
ssh [email protected] -p 222If you are in, that means good!
Add more ports if necessary such as port 80/443 (web)
Only Allow the Port if you need access, and give internal access
In the case of custom SSH port 222 above, only allow it when you need access and limit your public IP Address.
To remove the firewall rule:
sudo ufw status numberedsudo ufw delete XEnsure to run again the status numbered if you want to delete other rules.
sudo ufw status numberedBlocking the Ping
We want the machine to be hidden and to do this by blocking the ICMP ping request on the UFW firewall.
Start the terminal (Powershell) and log into the server
ssh [email protected] -p 222To edit the config:
sudo nano /etc/ufw/before.rulesAdd a new line under the #ok icmp codes for input section:
-A ufw-before-input -p icmp --icmp-type echo-request -j DROP
To save the document, press Ctrl + X and press Y, and enter.
Restart the firewall:
sudo ufw reloadReboot the machine:
sudo rebootRun the terminal to see if it’s rebooted successfully:
ssh [email protected]To test it, open up another terminal.
Ping the IP address:
ping xxx.xxx.xxx.xxxThis should display the request timeout.
Changing the Webmin Port
Webmin tool is used for managing the admin easily. Changing the port is the way to make it secure.
Open up the browser and access the Webmin via IP address and the default port.
Click the Webmin Configuration link.
Select the Ports and Addresses link.
Under the Listen on the port, select a specific port to 10001 for instance.
Under the IPv6 connection, select the No option.
Under Listen for broadcast on UDP port, type in 10001.
Click the Save button.
Under the Web Configuration, click the Restart Webmin button.
Starting the Webmin Service if only Needed
Open up the browser and access the Webmin via IP address and the default port.
Click the Webmin Configuration link.
Under a Start a boot time, select the No option.

Click the Start at boot time button.
To start manually:
sudo /etc/webmin/startTo stop again:
sudo /etc/webmin/stopSetting up Two-Factor Authentication in Webmin
Open the browser and access the Webmin via IP address and the default port.
Click the Webmin Configuration link.
Click the Two-Factor Authentication link.
Select Google Authenticator as the Authentication provider.
Click the Save button.
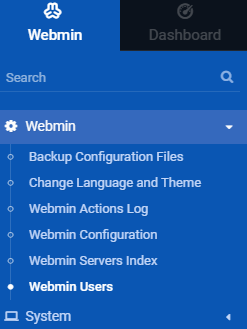
Go back and go to Webmin Users link.
Select the User and activate the Two-Factor Authentication by scanning the QR code.
Test by logging out of Webmin.
Log in again, and it should ask for the password and token.
That’s it! The solution above will at least protect the server. It does not mean it is not hackable, but it at least makes it the hacker to attack the machine, and we want to be safe.
Checking the PHP version
Check the current version:
php --versionThen it showed the 7.4.3 version
Then you check, hang on isn’t that the minor version already more than 3? It’s not being updated then ?!?!
It’s a common mistake!!! See below for an explanation.
The proper version needs to be checked on the apt package by running a command:
apt policy php7.4The output:

Then, search on Google to find the package’s (7.4.3-4ubuntu2.15) change log to see what’s included in that build.

Updating the PHP configuration
For the webserver (Apache) that uses the PHP module, modify the settings accordingly.
Before doing this, the php.ini can be in a different location, check the default location:
php --iniCheck the loaded configuration file location.
Download the php.ini, change accordingly, and upload back in:
expose_php = Off

display_errors = Off

mail.add_x_header = Off

session.name = PHPSESSID

allow_url_fopen = Off

allow_url_include = Off

disable_functions = show_source,system,shell_exec,passthru,exec,phpinfo,popen,proc_open,allow_url_fopen,curl_exec,curl_multi_exec
Restart the Apache:
sudo /etc/init.d/apache2 restartCheck the website if running ok or not.
The End
If you have reached the end of this article, congratulation. Hopefully, we have been able to shed some light on outlining what you need to know to harden Ubuntu Server.
We write this so that this is not a fixed article. Like in this journey, we learn as we go and re-write some parts, so please keep pinging with this article.
If you like this post, please check out our other related posts:
- Unleashing Zero Trust: Cybersecurity’s Game-Changer!
- Next-Gen Endpoint Security: Emerging Trends to Know
- Scams Exposed: Unmasking Deception & Lessons
- Healthcare Supply Chains Reimagined: Blockchain Innovations
- Get in Touch with Security Vendors: Your Guide to Contacting VirusTotal and Beyond
- Protect Your Business: Avoid These Cybersecurity Mistakes
- Scam-Proof Your Online Shopping: Tips to Identify a Legitimate Website
- Don’t Fall for the Trickery: Understanding Social Engineering and How to Protect Yourself
- How to Make Apple iPhone/iPad More Secure
- How to Install Linux and Python on iPhone or iPad
If you love this article or any security posts and you would like to receive an update on this article or our latest post, please sign up for the form below: